Difference between revisions of "Guide your lights"
(Created page with "__NOEDITSECTION__ Category: Projects done =What's this all about?= LED is very often used in various projects. There are many types with various colours, shapes, sizes. But ...") |
m |
||
| Line 3: | Line 3: | ||
=What's this all about?= | =What's this all about?= | ||
| − | LED is very often used in various projects. There are many types with various colours, shapes, sizes. But what if none meets requirements for your project? Maybe some custom made acrylic addon | + | LED is very often used in various projects. There are many types with various colours, shapes, sizes. But what if none of them meets requirements for your project? Maybe some custom made acrylic addon could help you out. |
This page presents a simple project showing how to easily "bend" a light stream using basic optics rules. | This page presents a simple project showing how to easily "bend" a light stream using basic optics rules. | ||
| − | =Physics= | + | =Physics behind it= |
In short: each substance has its own specific abilities to transport light. When two substances of different refractive indexes meet on light's way - the light changes its route by some angle. This can be used to "trap" stream of light and guide it in some specific direction. Just heat up the plexiglass and change its shape any way you want. New shape will be the route for light beams emitted into it. Cool, huh? | In short: each substance has its own specific abilities to transport light. When two substances of different refractive indexes meet on light's way - the light changes its route by some angle. This can be used to "trap" stream of light and guide it in some specific direction. Just heat up the plexiglass and change its shape any way you want. New shape will be the route for light beams emitted into it. Cool, huh? | ||
| − | If you want to get more about it, good starting point is wikipedia's site on refractive index (http://en.wikipedia.org/wiki/Refractive_index). | + | If you want to get to know more about it, a good starting point is the wikipedia's site on refractive index (http://en.wikipedia.org/wiki/Refractive_index). |
=Application= | =Application= | ||
==What will it do?== | ==What will it do?== | ||
| − | HDD can be | + | HDD can be the bottleneck of a computer system. This is why most of PC's have the HDD LED indicating hard drive's work - to notify the user of the reason why his machine might feel slower at the moment. It's a nice feature, but in my case - I am having my PC box under the desk, so I don't see the LED located on my box' front panel. I've decided to install the HDD LED above the worktop - on the LCD. Although, I am far from any permanent screen's tune ups and I am sure that just a glued LED wouldn't look any good. I've decided to hide the LED behind the LCD and just bend the LED's light stream to the front. I am using plexiglass for that purpose. |
==What one needs to do it?== | ==What one needs to do it?== | ||
| − | Whole set of incredients I've used for this one is visible on | + | Whole set of incredients I've used for this one is visible on the first of images below: |
* pieces of plexiglass | * pieces of plexiglass | ||
* saw | * saw | ||
| Line 27: | Line 27: | ||
* tweezers | * tweezers | ||
==How to make it?== | ==How to make it?== | ||
| − | Plexiglass comes as board, so first we have to cut desired shape out of it, but read about bending before you actualy cut it. Then we need to set the hot air station to about 200C degrees and heat up the board right in place where it is going to be bent. Plexiglass isn't a conductor, so it heats up very slowly. It may take even few minutes to properly heat it up. Plus of it is, that it also cools down slowly, so we'll have like half of minute to set the desired shape. Every touch leaves some mark on hot surface. Permanently! This is why you may want to cut coarse shape first and then cut it precicely after bending. During the long time of heating up, the heat spreads fairly within whole element, so be carefull when you touch it! After it's bent and cut, good idea is to even the visible surface. I've used sandpaper "80" first, then water sandpaper 800, and then I've put the polishing tip to my dremel. Be carefull not to melt the board while polishing - I've set my dremel to slowest possible speed. After this, the surface is all shiny and nice. On the other end of our light's guide we have to drill a hole to fit the LED in. Same as before - watch out with speed/heat during drilling. I'm using 3mm LED and 5mm plexiglass, so it's easy peasy. I overdid with the drilling here, so to | + | Plexiglass comes as a board, so first we have to cut desired shape out of it, but read about bending before you actualy cut it. Then we need to set the hot air station to about 200C degrees and heat up the board right in place where it is going to be bent. Plexiglass isn't a conductor, so it heats up very slowly. It may take even few minutes to properly heat it up. Plus of it is, that it also cools down slowly, so we'll have like half of minute to set the desired shape. Every touch leaves some mark on hot surface. Permanently! This is why you may want to cut coarse shape first and then cut it precicely after bending. During the long time of heating up, the heat spreads fairly within whole element, so be carefull when you touch it! After it's bent and cut, good idea is to even the visible surface. I've used sandpaper "80" first, then water sandpaper "800", and then I've put the polishing tip to my dremel. Be carefull not to melt the board while polishing - I've set my dremel to slowest possible speed. After this, the surface is all shiny and nice. On the other end of our light's guide we have to drill a hole to fit the LED in. Same as before - watch out with speed/heat during drilling. I'm using 3mm LED and 5mm plexiglass, so it's easy peasy. Still, I overdid with the drilling here, so to "shrink" the hole's diameter I had to first warm up the hole and then squeeze the board with tweezers a bit. After it cooled down, LED fit in perfectly. |
| − | All this is very simple. | + | All this is very simple. Pics below show the used tools and materials used as well as the product in several stages of development. |
<gallery widths=200px> | <gallery widths=200px> | ||
Image:Pit guide light IMG 2221.JPG|What I've used. | Image:Pit guide light IMG 2221.JPG|What I've used. | ||
| − | Image:Pit guide light IMG 2222.JPG|Polishing tip, | + | Image:Pit guide light IMG 2222.JPG|Polishing tip, LEDs and drills. |
Image:Pit guide light IMG 2223.JPG|Bent piece. | Image:Pit guide light IMG 2223.JPG|Bent piece. | ||
| − | Image:Pit guide light IMG 2229.JPG|Test light off. | + | Image:Pit guide light IMG 2229.JPG|Test: light off. |
| − | Image:Pit guide light IMG 2231.JPG|Test light on. | + | Image:Pit guide light IMG 2231.JPG|Test: light on. |
Image:Pit guide light IMG 2232.JPG|LED against the hole. | Image:Pit guide light IMG 2232.JPG|LED against the hole. | ||
| − | Image:Pit guide light IMG 2233.JPG| | + | Image:Pit guide light IMG 2233.JPG|LED installed. |
</gallery> | </gallery> | ||
| Line 46: | Line 46: | ||
Image:Pit guide light IMG 2239.JPG|HDD works! | Image:Pit guide light IMG 2239.JPG|HDD works! | ||
Image:Pit guide light IMG 2243.JPG|Behind the LCD. | Image:Pit guide light IMG 2243.JPG|Behind the LCD. | ||
| − | Image:Pit guide light IMG 2244.JPG|General view | + | Image:Pit guide light IMG 2244.JPG|General view of the LCD. |
</gallery> | </gallery> | ||
| − | = | + | =Conclusions= |
| − | + | This technique is really cheap and simple in my opinion. When done with enough care, it can also look really proffesional. There are several applications that I've seen and are using this trick. Ones that i can think of right now are: | |
| + | * Fancy looking furniture (i.e. glowing tables at disco clubs) | ||
| + | * Light glowing "lines" on front panels of any home audio gear (kudos to the 90's!) | ||
| + | * Optical fiber lamps | ||
| + | * etc. | ||
| + | I think the best usage for it for (even a hobby) design engineer, is a situation where you have your LED on PCB inside of a non-transparent box and you'd like to avoid floating wires inside the case. Just build a route for your light - from the onboard's LED right to the hole in the casing. | ||
| + | Other idea worth considering is that the light gets disorted within the plexiglass. Fitting few LEDs in it should cause mixing of the colours. For better result you may want to try experimenting with a non-polished visible surface there. Just sandpapered one causes more soft light output. In my opinion this technique gives nice possibilities, so i invite you to consider it when you design your next product! | ||
| + | |||
| + | Cheers, | ||
| + | [[User:Pit|pit]], 2011-06-30 | ||
Revision as of 06:25, 30 June 2011
Contents
What's this all about?
LED is very often used in various projects. There are many types with various colours, shapes, sizes. But what if none of them meets requirements for your project? Maybe some custom made acrylic addon could help you out.
This page presents a simple project showing how to easily "bend" a light stream using basic optics rules.
Physics behind it
In short: each substance has its own specific abilities to transport light. When two substances of different refractive indexes meet on light's way - the light changes its route by some angle. This can be used to "trap" stream of light and guide it in some specific direction. Just heat up the plexiglass and change its shape any way you want. New shape will be the route for light beams emitted into it. Cool, huh?
If you want to get to know more about it, a good starting point is the wikipedia's site on refractive index (http://en.wikipedia.org/wiki/Refractive_index).
Application
What will it do?
HDD can be the bottleneck of a computer system. This is why most of PC's have the HDD LED indicating hard drive's work - to notify the user of the reason why his machine might feel slower at the moment. It's a nice feature, but in my case - I am having my PC box under the desk, so I don't see the LED located on my box' front panel. I've decided to install the HDD LED above the worktop - on the LCD. Although, I am far from any permanent screen's tune ups and I am sure that just a glued LED wouldn't look any good. I've decided to hide the LED behind the LCD and just bend the LED's light stream to the front. I am using plexiglass for that purpose.
What one needs to do it?
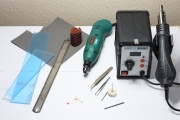
Whole set of incredients I've used for this one is visible on the first of images below:
- pieces of plexiglass
- saw
- sandpaper
- hot air station
- dremel
- drill
- polishing tip
- LED
- tweezers
How to make it?
Plexiglass comes as a board, so first we have to cut desired shape out of it, but read about bending before you actualy cut it. Then we need to set the hot air station to about 200C degrees and heat up the board right in place where it is going to be bent. Plexiglass isn't a conductor, so it heats up very slowly. It may take even few minutes to properly heat it up. Plus of it is, that it also cools down slowly, so we'll have like half of minute to set the desired shape. Every touch leaves some mark on hot surface. Permanently! This is why you may want to cut coarse shape first and then cut it precicely after bending. During the long time of heating up, the heat spreads fairly within whole element, so be carefull when you touch it! After it's bent and cut, good idea is to even the visible surface. I've used sandpaper "80" first, then water sandpaper "800", and then I've put the polishing tip to my dremel. Be carefull not to melt the board while polishing - I've set my dremel to slowest possible speed. After this, the surface is all shiny and nice. On the other end of our light's guide we have to drill a hole to fit the LED in. Same as before - watch out with speed/heat during drilling. I'm using 3mm LED and 5mm plexiglass, so it's easy peasy. Still, I overdid with the drilling here, so to "shrink" the hole's diameter I had to first warm up the hole and then squeeze the board with tweezers a bit. After it cooled down, LED fit in perfectly.
All this is very simple. Pics below show the used tools and materials used as well as the product in several stages of development.
What I've used.
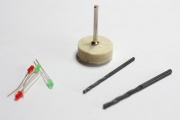
Polishing tip, LEDs and drills.

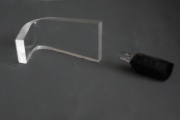
Bent piece.
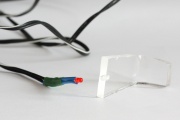
Test: light off.

Test: light on.
LED against the hole.
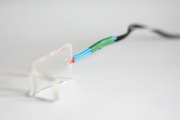
LED installed.


How does it look like?
Here are some pics of how it looks when it's done and working.
HDD idle.
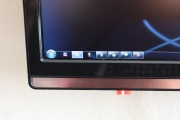
HDD works!
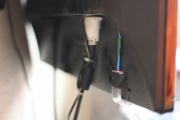
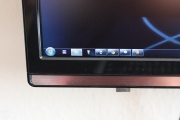
Behind the LCD.
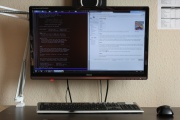
General view of the LCD.


Conclusions
This technique is really cheap and simple in my opinion. When done with enough care, it can also look really proffesional. There are several applications that I've seen and are using this trick. Ones that i can think of right now are:
- Fancy looking furniture (i.e. glowing tables at disco clubs)
- Light glowing "lines" on front panels of any home audio gear (kudos to the 90's!)
- Optical fiber lamps
- etc.
I think the best usage for it for (even a hobby) design engineer, is a situation where you have your LED on PCB inside of a non-transparent box and you'd like to avoid floating wires inside the case. Just build a route for your light - from the onboard's LED right to the hole in the casing. Other idea worth considering is that the light gets disorted within the plexiglass. Fitting few LEDs in it should cause mixing of the colours. For better result you may want to try experimenting with a non-polished visible surface there. Just sandpapered one causes more soft light output. In my opinion this technique gives nice possibilities, so i invite you to consider it when you design your next product!
Cheers, pit, 2011-06-30